How to Braid A Carrot

Note: I’ll have to put some thought into tagging this post.  I’m not sure anyone ever did a Google search using the term “braid carrot.”  Here goes:

Step one:

Purchase nursery six-packs of small, leafy carrot starters.  Make the following assumption: each cell contains one carrot plant.

Step two:

Plant accordingly.  Be sure to gather the neighbor’s day-care kids.  Turn tiny people into future gardeners.

Step three:

Wait 50 – 70 days.  Publicize your countdown in your blog sidebar.  This is an important step for those of us with “menopause brain.”

Step four:

Take the sage advice of a couple of bloggers who inquire “did you thin the plants?”  (Note: In my gardening defense, I know about thinning seeds.  I just ASSumed they were pre-thinned before I bought them.)

Step five:

Dig up a few ‘spare carrots’, in this case, the carrots planted on the other side of the curb garden as back ups in case the tiny gardener’s crop fails.  (One or two did and I was able to fill in accordingly) Realize, oh-oh…I didn’t thin the plants.  Thin one or two and watch them droop.  They didn’t like waking up early.

Step six:

Reset the countdown in the side-bar from 50 to 70 days and wait some more.

Step seven:

The most important step of all: Watch the tiny gardeners cute, wondrous faces as they dig up a carrot and realize what they’ve grown.  Picture me smiling from ear to ear.

carrot harvest 2

Tiny gardener harvesting carrots

carrot harvest 1

Carrot unearthed

And if you’ve read this far, here is the tutorial I promised.

How to braid a carrot:

  1. Refer to steps one through seven.
braided carrots

Braided Carrots

It Takes a Village: Wee Little Carrots Under Wraps

baby carrot

Baby Carrot

If you’ve been reading along, you’ll know of my recent garden misstep: failing to thin carrots.  I’ve always thinned the plants I grow from seed, but incorrectly assumed that the starter plants were pre-thinned. (They weren’t).

I’ve been getting wonderful advice (from The Contented Crafter)…

Oh dear Alys! Carrots need thinning, Boomdee was right. If you are concerned about the size of them [and you can always check with another dead of night forage] I wonder if you might suggest to the tiny gardeners that the garden fairy has whispered in your ear that the carrots need a little longer to grow a bit bigger …. … Whatever the outcome I’m confident that provided the tiny gardeners get to eat a carrot, no matter what size, it will have been a successful introduction. Can’t wait to hear how it goes 🙂

moral support (from LB)…

I look forward to hearing about the tiny gardeners and their excitement over the harvest! (good thing it was Boomdee there and not me; I had no idea that carrots needed to be thinned)

and a fit of giggles from Boomdeeadda:

As for the carrots…..I only know that ONE thing about vegetable gardens because I grew a whole row of mutants and misfits myself, LOL.

Attention Gardening Nirvana readers: Boomdee knows basically nada about vegetable gardens!!! LOL.

I planted abundantly to ensure wee gardener success, so it was safe to unearth one of the plants when the coast was clear. Sure enough I uncovered half a dozen tiny carrots, clustered snugly together. They looked cozy, like a litter of tiny kittens intertwined.  Carrots and kittens eventually grow up, though, and need their own space.

I quickly divided the plants, replanting within minutes hoping they wouldn’t mind the brief interruption. I patted the earth and walked away.  Nothing to see folks, nothing to see.

By day two, carrot greens rested on the soil.  I refused to give up hope.  Day three, still on the droopy side.  It’s now been a week and no real sign of recovery.  So…

Today I decided to leave the rest of the carrots undisturbed.  I’ll let them grow for one more week (it’s a 50 – 70 day crop).  Then the wee gardeners can harvest and take home tiny carrots to share with their family.

One of the best parts of documenting your garden in a blog: lessons learned for next year.  Thanks for supporting me on the journey.

Halloween Countdown:

purple monkey on pumpkin

Purple monkey on a pumpkin (This sweet little monkey was a birthday gift from my talented friend, Laura.  She dyed him this color, then added all the beautiful details.  Isn’t he cute). Dharma Trading Co.

Gardening vs Blogging

Newly replanted sidewalk strip

Newly replanted sidewalk strip

Today was one of those days: I could garden or I could blog about gardening, but I couldn’t do both.

Gardening won!  With great joy, I replanted the sidewalk strip with a bounty of perennials.  I’ve reserved a spot along the sidewalk and away from the street for carrots.  I have several cell packs in reserve for next week, when my neighbor’s day care kids will get to ‘plant a row.’ The children love playing on my ramp and deck, and last year helped me plant a few bulbs.  I know they’ll have fun planting the carrots and watching them grow. I also bought a packet of sweet peas, and *bonus* a sweet little climbing trellis.  It creates a nice focal point in the center of the garden.

Darkness fell by the time I finished planting, watering and putting away my tools.  I promise a better set of pictures by daylight soon.

And with that, this happy gardener is taking her aching back to bed.  Sweet peas…I mean dreams.

Garden Calendar Lives Another Day

Have you hung up your 2013 wall calendar?  Do you love a new calendar as much as I do?

My sister gave me The Old Farmer’s Almanac Gardening Calendar this year.  It’s always been one of my favorites.  The pages are beautifully illustrated with helpful notations and interesting quotes. Here’s one:

Benjamin Franklin introduced kohlrabi to colonial America.The vegetable’s German name originated from the Italian words cavolo rapa, meaning “cabbage turnip.”

You learn something new every day! 😉

It’s fun turning over a new page to a new month and a fresh beginning.  Conversely, I removed my 2012 gardening calendar with great anticipation. In the past few years I’ve been re-purposing the beautifully designed pages into envelopes and stickers, tags and the odd bookmark.

This year I’ve challenged myself to use all of last year’s garden calendar in new and different ways. Here’s what I’ve been up to:

Gift Card Holder

This design simply evolved based on the pattern of the flower.  The gift card holder folds into thirds and is held in place by a sleeve.  When the sleeve is in place, the butterfly keeps the top flap from opening.

gift card holder

Gift Card Holder (cutaway with sleeve)

Gift Card Holder

Gift Card Holder (closed)

Desk Top Organizer

I’ve always loved little boxes, and this one is no exception.  It arrived with some unexpected treasures from a dear friend.  Rather than pack it away with the Christmas gear, I covered the box with four different calendar pages. I used the stiffer cardstock from the front of the calendar to make a pair of dividers.  Now I can easily get my hands on what I need.

Christmas Gift Box

Christmas gift box from a dear friend

Desk Top Organizer

Desk Top Organizer

Dividers

Dividers

Box Lining

Box Lining

Napkin Rings

Once folded in half and glued together, the pages are quite sturdy. I cut them into strips, formed a ring, and stitched them together with a scrap of raffia.  Now I’m all set for Thanksgiving.

Napkin Rings (8 for next fall)

Napkin Rings (8 for next fall)

Envelopes, gift tags and stickers

Assorted gift tags and labels

Assorted gift tags and stickers

Envelope

Envelope

Wine Tag

Wine Tag

Postcards from the Edge

I used the only bit of white from the calendar to create a writing space.  The reverse side of the postcard has a quote.

Two-sided postcard (back side has quotation)

Two-sided postcard (back side has quotation)

Bunting

For the Fairy Garden…of course.  🙂

fairy garden bunting

Drawer Liners and a Poster

Drawer Liner

Drawer Liners (My husband swears we need all these remotes)

Poster

Poster (back of guest bath door)

Check this out:

Katherine at Pillows a-la-Mode likes to re-fashion or re-purpose clothing in a similar fashion. She held a contest a few months back. The lucky winner mailed her a beautiful embroidered jacket (that not longer fit), and Katherine turned it into a tote bag, a tissue holder, a pillow and more. You can check out the contest winner and lots of other fun ideas at Pillows a-la-Mode.

Mercury News Garden Calendar: An Annual Tradition

DSC_0047
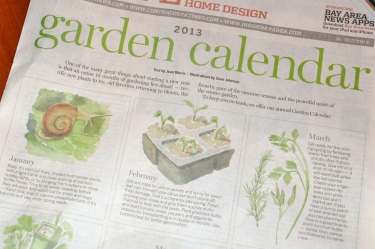
Our local paper publishes a garden calendar every January. The 2013 version arrived with Saturday’s paper. The calendar is a single page, always beautifully illustrated, with general gardening guidelines arranged by month.

I hang the calendar on the back of the garage door and refer to it throughout the year. It doesn’t hold any special advice or information that I couldn’t easily find online, but I hang it up anyway and check in to be sure I’m on track.

I used to be a haphazard gardener. My intentions were good, but also easily derailed when my boys were young. Months would pass before I checked in with the calendar again, but I hung it up just the same.

In this era of declining print, I wonder how long ‘the papers’ will stay in business?  Though I enjoy the immediacy of the internet and the incredible access to information, I still enjoy the feel of a newspaper.  It’s fun looking forward to the yearly calendar.  We check the local section for “spare the air” days and my boys check the weather.  Yesterday’s news is great for catching debris when you re-pot a plant.  You can even add it to your compost pile.

Of course newsprint comes from lumbar, so less paper means more trees.  I can certainly get behind that.  Change is both good and inevitable, but as annual rituals go, I’ll be sorry if and when this one is gone.

For a closer look at the San Jose Mercury news Garden Calendar (available, of course, online) follow this link.  Illustrations by Dave Johnson.