The Making of The Miniature Little Free Library

mac approved mini little free library

Photo shoot in the fairy garden before mailing the LFL

This is a follow on post to It’s the Little Things (Even Libraries) published last week. You can catch up with part one here.

It took me years to realize that everyone creates differently. I admire designers that can sketch an idea, and then make it come to life. I tend to work in reverse. Ideas rattle around in my head where they’re examined and discarded. These ideas simmer in my brain before a usable plan comes together.

My first fairy garden miniature library started with a small box. I thought I would do the same with this one, but none of the boxes in my stash seemed right. I visited a craft store, put a couple of items in my cart, then put them all back. Eventually I left the store with a small container of blue paint and a receipt for seventy-five cents.

Back home, using a photo of Carrie’s library as a guide, I cut pieces from a thin piece of cardboard. I wanted the library to have a working door, so I cut a small rectangle in the body of the library. I cut a cardboard frame for the door, and backed it with clear packaging from a packet of batteries.

Carries library with miniature

Carrie’s full-sized library on the left, the miniature version on the right

mini little free library construction

Constructing the miniature library

It took three coats of paint to cover the glossy white cardboard, but after two days the color looked even.

If I had it to do over again, I would install the door first, and then assemble the library. It would have been handy to have fairy-sized hands that day. I persevered.

After taping the plastic to the door, I glued a tiny hinge in place. On the library itself, I poked two small holes into the opening, then used tiny brads to hold the hinge in place.

mini little free library door hardware

Door hardware

On the opposite side of the door I attached a “doodad” from my stash, holding that in place with another brad. This allows the door to open and close.

mini little free library open door

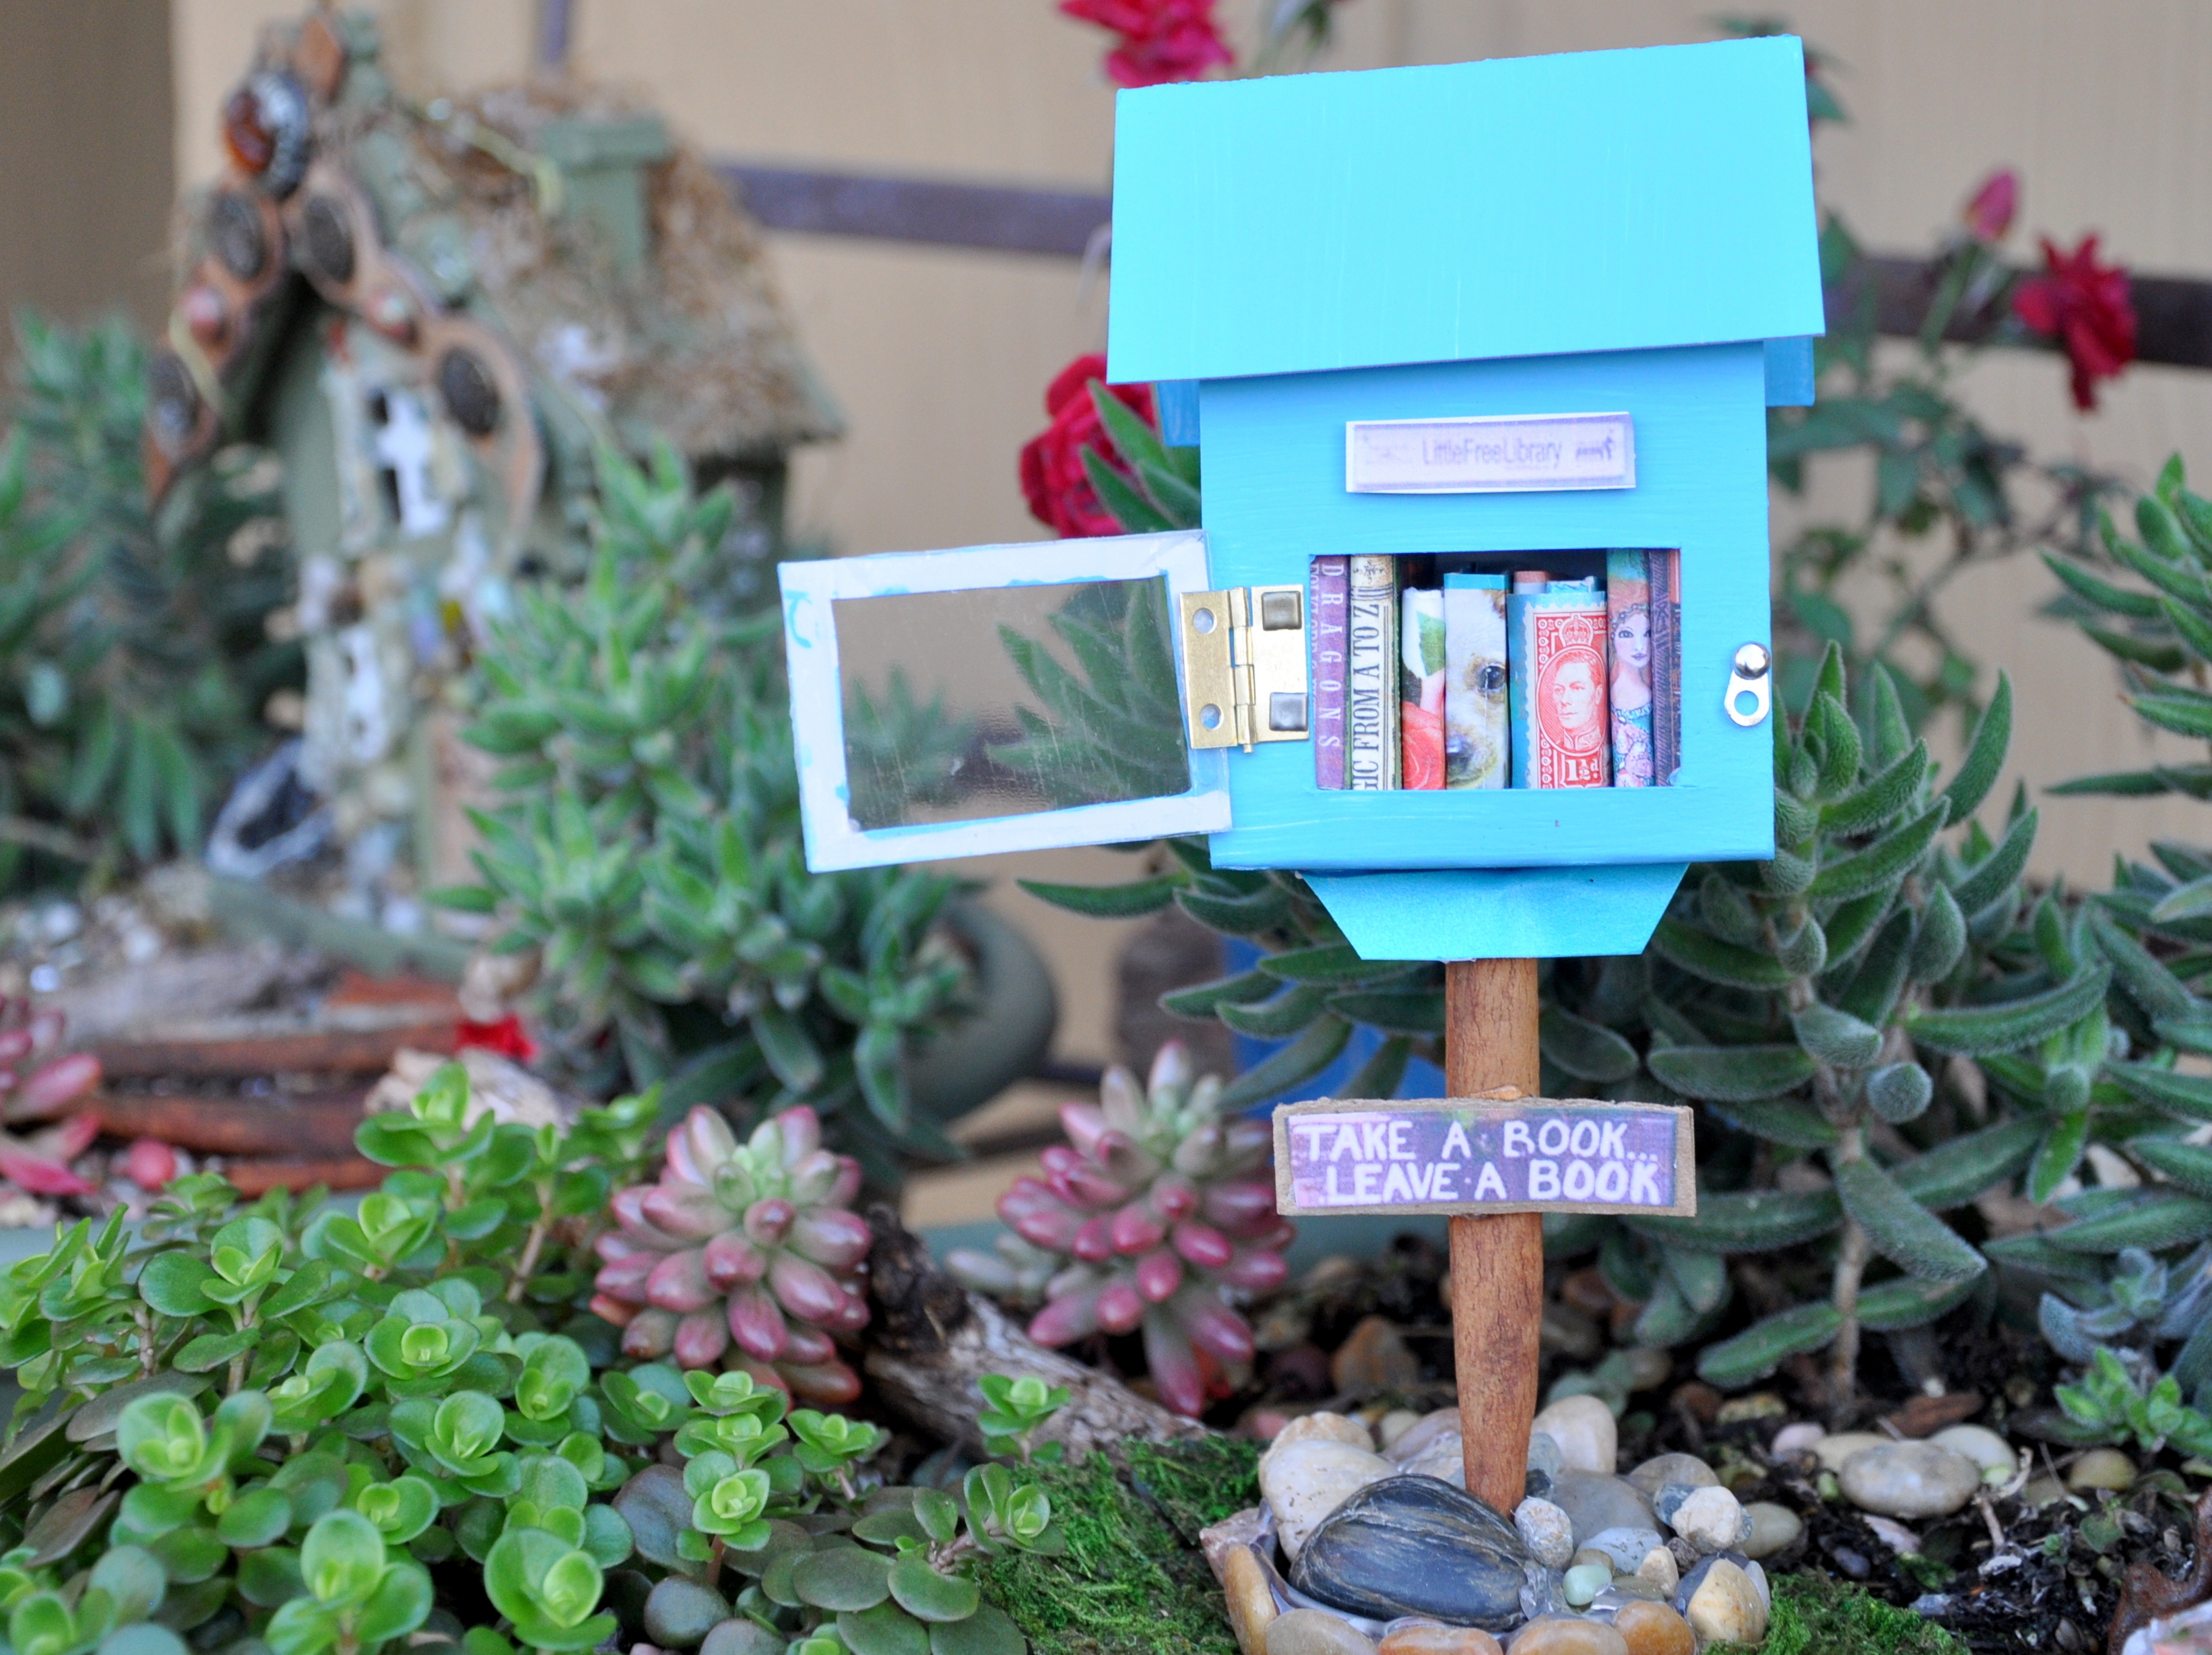
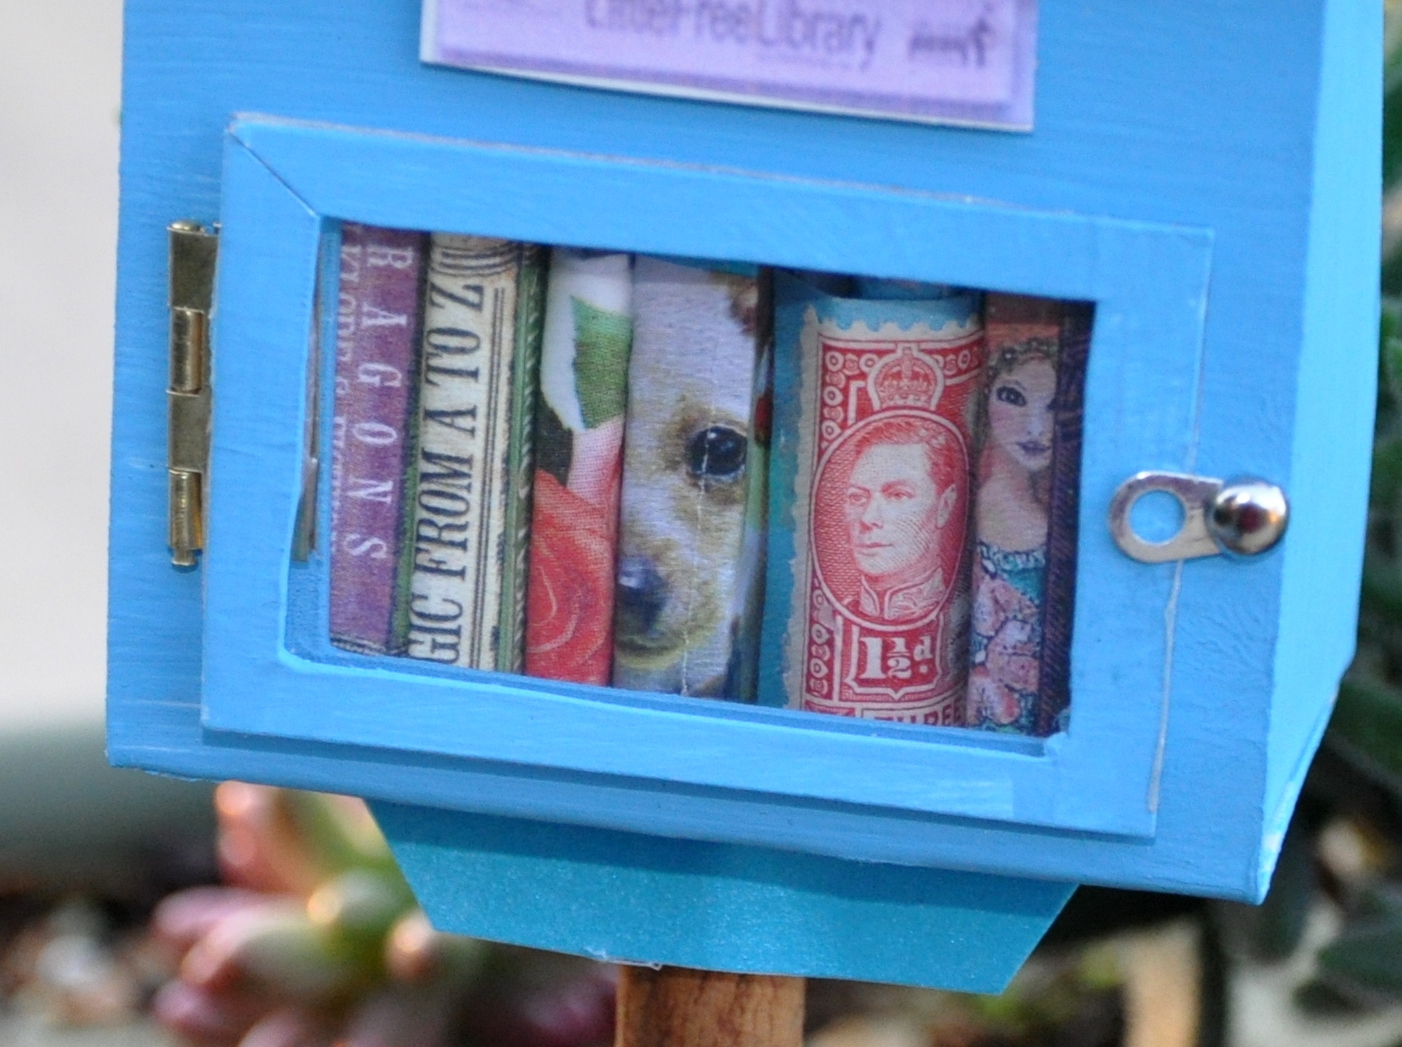
Miniature LFL with a working door

Since the opening is small, I made a removable roof so adding books is a breeze.

Carrie’s library sits on a wooden post surrounded by a circle of stones. To replicate the look, I used a cinnamon stick, a small metal lid and a handful of pebbles from my fairy garden stash. I hot-glued the cinnamon stick to the inside of the lid, and then glued rocks into and around it. This gives it weight and stability. I downloaded a copy of Carrie’s library, and photo-copy reduced the two signs to scale. Then I headed to the kitchen, tore off a corner of a box of cat food cans, and used the cardboard to mount the signs.

mini little free library take a book sign

Miniature library stand made from a cinnamon stick, a candle lid, pebbles and hot glue

Then on to the books. Again, lots of ideas tried and discarded before I came up with a plan. I used the binding from a couple of paper sample books passed on to me years ago. I cut through all the layers of the sample booklets, and then cut sections down to size.

mini little free library book making supplies

Sourcing supplies for the miniature books. Upper left, clockwise: sample books used for structure, book covers made from a recycled Humane Society calendar, one of my dad’s vintage stamps, floral Washi tape, Graphic 45 printed paper

Each tiny book has a unique cover with a small story to go with it. (The actual books are blank inside, so you have to use your imagination.)

I wrote a six-word story to go with each book, something meaningful to me or to Carrie. Here they are:

Trust, betrayed. Rescued dog’s love, restored.

Flowers. Achingly beautiful. Harbingers of spring.

Magic. How we see the world.

Wanted child. Your new family awaits.

The Wonderland of Alys in miniature.**

Daddy’s stamps lovingly travel the world.

Dragon Folklore. Escape inside a book.

mini little free library collage

Can you match the books with the six-word stories?

**The Wonderland of Alys is a collage art piece by Pauline King, a friend and fellow blogger. The original hangs in our home. The tiny replica of this piece is a sticker, sent to me at Christmas by Julia of Defeat Despair. I couldn’t resist turning one of those art stickers in to a tiny, make-believe book.

Pauline King art the wonderland of alys

Pilates and Cards of Destiny

playing card gift detail

Elizabeth’s initials between glass beads

Moving your body is key to good health. In addition to getting plenty of shut-eye, exercise gives you energy, strength and endurance. It’s also terrific for your heart, your lungs and your soul. For as long as I can remember I’ve been a mover. I joined the gymnastics team in high school, then moved on to dance in college. Tap was my favorite. After college I took Jazzercise, then picked up running as well. I hiked and even took a few belly dancing classes.

Years of injuries started to take a toll. I spent more time with physical therapists than I did on the trail.

Then I discovered Pilates. The exercises keep my back supple and give me the strength I need to work. The classes are challenging but that’s also what keeps them interesting. Keeping strong means I can continue to organize clients.My work involves a lot of bending, lifting and twisting. I attend two, one-hour classes a week and have stuck with it for a decade.

Tru-Balance Pilates Fitness

Elizabeth Cassidy owns and operates a Pilates studio in the Willow Glen community of San Jose. I have her to thank for the improvements to my posture and strength. Many of her students come to her with injuries. She has an innate understanding of how the body works. She’ll take one look at you and say “your back is out” or “what happened to your foot?” Even in group classes, she finds ways to accommodate our individual needs.

When Elizabeth’s birthday rolls around, I like to do something special. She’s passionate about cards and has her destiny cards displayed in the studio. She studied the science of cards in a destiny workshop with Robert Lee Camp. She made a copy for home, but damaged it in a move. That’s what inspired this gift. Now she has a second set to display at home.

destiny cards

Elizabeth’s Destiny Cards

I bought a few tools and some beads with guidance from Laura at Sew Beadazzled. Getting the holes just right was the most challenging. Once all four corners of each card had holes, I joined the rows with easy-bend rings. Laura said to open the rings in a twisting motion, instead of prying them apart. I’m sure I saved myself hours with that little tip.

Elizabeth taped her set of destiny cards to the studio wall, but these cards needed to hang free. After some thought, I bought a thin dowel, had Mike cut it into two pieces, then covered each piece with playing card-inspired Washi tape. I tried a shoe string, some ribbon and even considered more rings to hang the entire thing from the top but none of those options were quite right. Then I pulled out a black and white eyeglass lanyard from my craft supplies and yelled “Eureka!”…or something like that. With that in place I called it done.

I bought a large polka-dotted gift bag and added cards and butterflies to the mix.  The gift card is a series of playing cards hinged together with Happy Birthday spelled out in black vinyl letters. (I forgot take a picture). I made an envelope using an over-sized vintage envelope from my friend Donna’s vintage booth.

It was lots of fun creating something new and different with only a general idea of where it would lead.

gift bag close-up

Gift bag close-up

vintage playing card envelope

Vintage, over-sized playing card, made in to an envelope

Vintage, over-sized playing card

Vintage, over-sized playing card, reverse

Have you tried something new lately, something you wouldn’t normally do? Please share in the comments below.

Petra Paper Pots

It took forever to get around to this project. Funny how you put things off, then end up having  a good time. Does that ever happen to you?

I wanted three coordinating pots for the kitchen window, but could never find anything I liked in the right size.

Then last fall I picked up a couple of hydrangeas for the garden. They came wrapped in the pretty watercolor ‘paper’ you see below.  So…why not buy inexpensive clay pots and try my hand at Mod Podge®? I could use the watercolor paper to spruce them up. It has a smooth texture on both sides and it’s waterproof.  In fact the Petra Paper™ is 80% rock.  Cool beans!

The three pots and the Mod Podge came to less than $20.  The paper was free.  The fun was priceless!  Okay, I’m just being silly now, but I did have fun trying something new and I’m happy with the way they turned out.

I had two sheets of the Petra Paper to work with.  One sheet was *exactly* the right size for the largest pot.  Serendipity.  The second sheet covered the two smaller pots

petra paper collage

Materials for the project

Once I determined the dimensions of each pot, I cut the paper into several strips, leaving it attached at the top.

After applying two base coats to the pots, which dried clear, I applied a third coat to the back of the Petra paper. I wrapped the paper around the top, then overlapped the strips as I went along to allow for the angle of the pot. Once dry, I applied one more coat, then trimmed the bottom edge with a sharp knife.

The layers give the pots a bit of texture and work well with the blended colors.

strips and glue

Strips and glue

Pauline at The Contented Crafter suggested a coat of car wax to give the finish a bit of luster. That too was fun.

Today I made it to the store for a bag of fresh potting soil, and the plants are now re-potted, watered, freshly showered and back in the window doing what they do best. Grow.

watercolor pots

Watercolor pots

two rainbow pots

Pot detail

Kitchen Window

Stunning Schlumbergera

Stunning Schlumbergera

When we remodeled our kitchen nearly a decade ago, we enlarged the kitchen window.  Not only is it wider and taller, it’s also deeper.  I’ve kept things growing there ever since.  It’s the perfect spot for plants, with indirect light, kitchen humidity and absolutely no excuse to forget to water the plants.

plants in the window

Trio of plants on the kitchen windowsill

Many of my houseplants outgrew their small pots and no longer fit in the window.  These Christmas Cactus (Schlumbergera cultivar) are another story.  They like cramped roots and require very little care.  The plant in the center is new, but the plant on the right is 17 years old.  I gave it to my husband for Christmas, one year. He’s always been a fan of these pretty plants.  The plant on the left  side of the window was a house-warming gift and is now ten.

soft pink bud

Soft pink bud

I think it’s finally time to re-pot.  I’ve been searching for just the right vessel but without much luck.  The pots I like are either too small, too large, missing a hole in the bottom, etc.  You know the drill.

I decided to buy three clay pots and try my hand at decoupage.  Last year I added gold leaf to my outdoor clay pots with pleasing results.  It was also a lot of fun.

I saved the ‘wrapper’ from a pair of  hydrangea  with this project in mind.  It has a pretty, watercolor affect and it’s durable.  In fact, the wrapper is made from rock.  Pretty cool, eh?

Like a lot of things I want to do, but haven’t tried before, I’ve been procrastinating.  Now it’s time to get to it.  I hope they turn out well.

Do you procrastinate when you’re afraid to try something new?

Serendipity: My Word of the Year

mixed media

Mixed-media

Some people choose a word for the year instead of making resolutions. I like the idea, but didn’t really plan to choose one of my own. Instead, I think a word chose me: serendipity. I’ve been wading through the Carl Jung philosophical discussion of synchronicity which lead me to the more accurate idea of serendipity: a happy accident.

Yesterday I took a two-hour mixed media class at a local studio, A Work of Heart.  We started with three small canvases, and three tag-board hearts.  We applied a thick, clay-like medium to each canvas, then used templates to make impressions in the medium before it dried. The template I used is reminiscent of a beehive.

While we waited for it to dry, we got to choose a page from sheets of music, children’s books, or a dictionary.  She had stacks of them.  I reached for a children’s book, and quickly came upon Alice in Wonderland.  Not only was this a childhood nickname, but I still have a few of the beloved pages from my copy of the book, a gift from my grandfather in England. It’s one of only a handful of possessions we brought from Canada.

Serendipity!

The class continued and it was great fun.  We mixed our own secondary colors using three primaries, then painted over the medium.  We cut the hearts from our chosen pages, in my case Queen Alice.  We spent a joyful two hours, layering, painting and stamping till we had the desired effect.  When it was time to add the final detail, a couple of words or a quote on each page, I went back to Alice.  There, on the second page, was the following quote: “Where do you pick the flower?” “In a garden or in the hedges?”

Serendipity!

In other words, I made a work of art at A Work of Heart using pages from Alice in Wonderland, managing to find a garden quote in the last few minutes of class.

Yep…serendipity!

Oh and one more thing: when I looked up the term synchronicity, Wikipedia cited a passage from (you guessed it) Alice.  Here’s the passage:

One of Jung’s favorite quotes on synchronicity was from Through the Looking-Glass by Lewis Carroll, in which the White Queen says to Alice: “It’s a poor sort of memory that only works backwards”.

‘The rule is, jam to-morrow and jam yesterday – but never jam to-day.’

‘It MUST come sometimes to “jam to-day,”‘ Alice objected.

‘No, it can’t,’ said the Queen. ‘It’s jam every OTHER day: to-day isn’t any OTHER day, you know.’

‘I don’t understand you,’ said Alice. ‘It’s dreadfully confusing!’

‘That’s the effect of living backwards,’ the Queen said kindly: ‘it always makes one a little giddy at first–‘

‘Living backwards!’ Alice repeated in great astonishment. ‘I never heard of such a thing!’

‘–but there’s one great advantage in it, that one’s memory works both ways.’

‘I’m sure MINE only works one way,’ Alice remarked. ‘I can’t remember things before they happen.’

‘It’s a poor sort of memory that only works backwards,’ the Queen remarked.

Queen Alice

canvas

Where do you pick the flower?

canvas art

In a garden,….

canvas art

…or in the hedges?

Contact Form

I love the blogosphere grapevine, but figured it was time to add a contact form so folks could get in touch.  Comments are always welcome, but if you’re looking for a private way to get in touch this is the ticket.

You can add a contact form to a post or create one as a static page.  Readers can contact you without the need to publish your email address.  My new contact form is in the pages tab, above.  If you want to create one for your own blog, here is a quick and easy tutorial from WordPress.

Queen Alice

Queen Alice